Tuesday, February 2, 2010

Bulletin board=Happiness

Part 3 of the desk nook...
This is where is all starts coming together-finally!
Ok for months I've had these strips of paper taped underneath each rattan box cubby telling me what each is for...

They seriously looked crappy. I've had an idea in my head all along-and ran into them the other night when shopping for the bulletin board...
2.99/yard for burlap at Joann Fabrics. I needed just shy of 2 1/2 yds.

Scrapbooking bookplates. $4.Found them at Joann's 40% off. Ended up having to buy 2 packages since I didn't realize there were assorted sizes...

Since the silver handles on the drawers are brushed silver I'll probably hit these with fine sandpaper. They'll be screwed on under the 6 basket cubbies where the papers were.

Trav installed 3 spacer boards on the wall to attach the board to give it stability (well, more like he added 2-there was already one up above that you can't see that is helping support the shelf bottom) so he just evened it all out.
I think the board we used was called homasote board. (?) We found it at Menards and is about 1/2 inch thick and pretty heavy. Note that I had to cut it down and rig it into 2 pieces to get it to fit the area I needed. I glued them together with Goop and those paint stir sticks for a little stability-lol. Stapled the burlap on just like I'm upholstering a chair...The back is never pretty-but who cares-no one will ever see it once it's up, right?

Tah dahhhhhh!
I cannot believe how MUCH I love it! The texture really warmed up what was kind of a cold space. I still need to hang the little silver plates after some minor paint touch ups today. Still need to attack those shelves above-but will have to wait for another day. One is just getting over the stomach flu here and another one has started and the 3rd is out of school today and going absolutely stir crazy!


Off to go play Go Fish.....Have a great one!

~Amanda

Monday, February 1, 2010

Getting there~Desk progress...

So close...We got so much done this weekend!! (Shocked since the 3 year old must have a stomach bug and we're zombies from being up all Saturday night) but we *mostly* completed 2 big projects!

First up: the desk nook.......

So I'm continuing this from the previous post~ I ordered the glass top~it was the wrong size. hmm. The girl typed the order up as 2 inches too short. Not happy. Luckily she re-ordered it no problem...but there was a slight problem. They decided to skimp on polishing the edges this time around. Again-not happy. Decided not to mess with it-it's too much of a pain to haul an 8 ft piece of glass in a minivan. Moral of the story? Make sure your husband checks each little thing and measures before leaving the place.


Drilling the hole for the cords-I opted for 2 holes at each end of the desk.


Hole at the left side.


Wah lah-with the white desk grommet in place...
Looks better already!

The under cabinet lights (3) were installed. We picked them up at Ikea on our last time dirt cheap.


Close up of a light.
Exciting-I know...

The little cord catcher things Travis picked up and screwed along the under edge of the shelf to keep them nice and hidden.


This is the kind of help he was getting-along with plastic drills and screwdrivers. See why these projects of ours seems to take a wee longer than norm?


A good shot of the cord holes at either end of the little wall inset. The switch for the lights will be tacked up to the wall-not just hanging there like that...

And from farther back. The old desk (to the left) is now carried out. Yesterday I spent gobs of time upside down and twisted around hovering over the glass top to prime and paint the underneath of the shelves where the lights were. (I could slightly see under there from the couch and it was driving me NUTS!) It looks so nice and clean now. Edges caulked and smooth...Love it!

I can't wait to re-arrange the shelves so it doesn't look like such a jumble!
Next update: the bulletin board for the back wall.....


~Amanda

Sunday, January 24, 2010

New desk!

I've always wanted a "office nook". I've been sitting on a magazine photo for 5 yrs of what I've wanted...finally-light at the end of the tunnel. have I mentioned before how lucky I am that Travis can do whatever he puts his mind to? I can't believe I'm showing my mess-but here goes...


I took this picture last summer. Our old desk was just kinda shoved in there under the shelves that I had Travis make for in the sunroom. Unfortunately I need to learn to arrange shelves pleasingly but for now it's serving it's purpose...

Anyhow, the plan has been to either a) build a desk to fit the expanse of that area or b) find one but it would be really hard to find that size...we ended up doing a little of both.

We ended up buying 3 freestanding file drawer units from JC Penney's. (of coarse they weren't on clearance when I ordered them!) I'd have bought 4 but there would be no leg room and if I bought only 2 there would be so much wasted space. So I settled for 3 (even tho the symmetry is going to drive me INSANE-but that's something I'm working on in all aspects of my life right now...)


Travis built the top of the desk using 1x12's. He biscuited them together to make one solid top and notched out the back section since the wall does that weird little inset. It was filled with wood filler, sanded, primed, sanded again, and painted like 3 times. He added an extra little piece all the way around to make it appear beefier than it actually is. There are lots of little support pieces on the bottom and an extra support piece back at the wall where the notched section sits on. The files were all screwed together then the top screwed on.


Lol-and here's the mess on the other side of the room. Gabe was helping by taking Dad the mini shopvac from my studio.


I honestly had pictures of the assembly process of the top by can't find them! ER.

So, my plan-if you can picture-is to have a thick glass top cut (tommorrow!), make a burlap covered corkboard for the wall inside the little inset area, hang under the cabinet lighting underneath the shelves and hang some of those cute vintage description tags to replace my pieces of paper under the baskets.

Boy-I really need to dig out some pictures of this room BEFORE it even came to this...maybe that will be my next post...

Saturday, January 2, 2010

A New Year~ A New Room

Happy New Year People!

I have no excuse for abandoning this poor forgotten blog...Bad of me...especially since we've done so much to the house this year it's crazy!

I WILL catch up on some belated photos of our projects soon...very soon. For right now I want to talk about the newest project: The Living Room.


From Thrifty Decor Chic. I just love these bamboo blinds...I will have them...

I knew it was coming.....agreed upon to start after the Christmas mess was cleaned up and put away. I am indeed doing a room switcharoo-and now that the time has arrived-I am stumped! I am without a master plan, paint colors, etc. I think this revolves around the simple fact that we need new furniture like-wayyyyy bad. And we do agree. I totally see HIS point of view. Trav points out the lack of practicality of having a white couch with 3 small kids-lol. Just last night I was scrubbing ink out of the mustard yellow slipcover we have...so I can only imagine white!


Photo from Sweet Savannah-This room loooks so yummy and cozy! And look at that white couch! Agh! Love!

I love me some burlap...And organizer thingies. I need some of those around here!


What I do have, however, are these few inspiration pics. I will have to start here and hopefully it will all mesh together into something cozy!

Photo from The Lettered Cottage. I love the dark flooring in contast to all the light airy tones.


This tops it all. This may be the silliest inspiration photo ever but this is IT. This is the feel I want-the colors-everything. As Rachel Ray would say "YUM-O!!" This will be my living room...oh yes it will!

So...as you can see there quite a unified theme...But I feel I shouldn't pick a paint color or floor coverings until a couch and chair have been found. I could probably afford to go fairly bold on the walls if I chose to since there is wainscoting along the bottom 1/3 of the walls in that room. I'd better get to work! I wonder if this will get done in 2010? lol


Friday, September 4, 2009

Lookie here...

Hey Kim-check out what I saw in the Ikea catalog tonite! Not sure if you'd looked here or not yet...
It's only $89 too!


Scrolling through I found this one too...I know you're looking for a lighter color but I like this for ME-lol. Love it... $99.
~Amanda


Monday, August 24, 2009

~Our home~

It hit me the other day that maybe we should have kicked the blog off with intros to the exteriors of our homes! *smacking myself in the forehead* Oh well, we're not that far into it...

Here is our home as of last week. Just you wait til you see the before pictures-yuck!
There is still tons to do around here.....new mailbox, house numbers, landscaping, driveway tear-out, garage siding, back patio/deck, finish tuckpointing and foundation painted, rebuilding of the side patio, privacy fence....and that's just the exterior. I'm sure I could find more projects if I tried-lol.


It's hard to see in this photo since our Magnolia tree is in the way-but our daughter, Chloe's window bays out nicely up on the left filling her room with sunlight. There is also a nice big triple window in the attic up there....which hopefully one day become a master suite?? :)

Here it is before we got to it...March 2005. This isn't the best picture but it's all I could find right now. At least you can see the old nasty siding and how there was no front porch...

We actually bought it in 2004 and had to work on it for a year before moving in just to get the inside liveable. It was a foreclosure and not lived in for quite some time. We're talking dead birds all over the floors people! I still have no clue what we were thinking tackling this w/ a 3 year old...Luckily we had family help in the beginning...

Ugh, I can still remember the smell of those bushes. They smelled like cat pee. Nasty. So thankful we yanked those out...

So...it's certainly not complete yet BUT I think we've made HUGE strides in changing this house for the better! I don't think of it too often but sitting here looking at photos really makes it sink in how much we've done :)

Friday, August 14, 2009

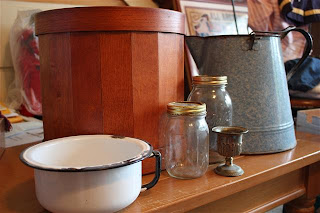
Attic stash!

Does anyone have an area of the house that old stuff accumulates and you have forgotten about it for...ohh...let's say 5 years?


I feel like I just went shopping in my attic! lol.


I was up there yesterday trying to do a little bit of organising here and there and started gathering interesting antiques/junk I've had shoved in and behind boxes...I've got a little pile started and know there's a ton more. And oh! Picture frames galore!


We moved in 4 years ago but remodeling started a year before that. Most of this was stashed up there at the time and hasn't been looked at since. I am envisioning all sorts of things I want to do....we're just needing some more horizontal surfaces to place things...What a goofy problem to have, I know.


I even found an awesome antique trunk that was forgotten about and filled with Trav's ugly old sweaters from the 80's/90's (say it together now: EWWW!) The sweaters are officially in a Goodwill pile and that gorgeous trunk is already in our living room acting as an end table. I'm not in love with it there right now-probably since I'm not loving the room in general...I'm thinking of pulling a Canice Olson and doing a room swap-eeep!!!!

~Amanda